|
PaintShopPro ***
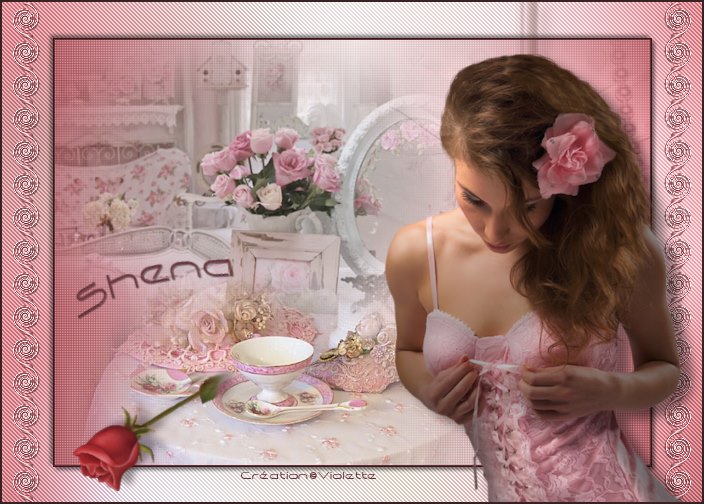
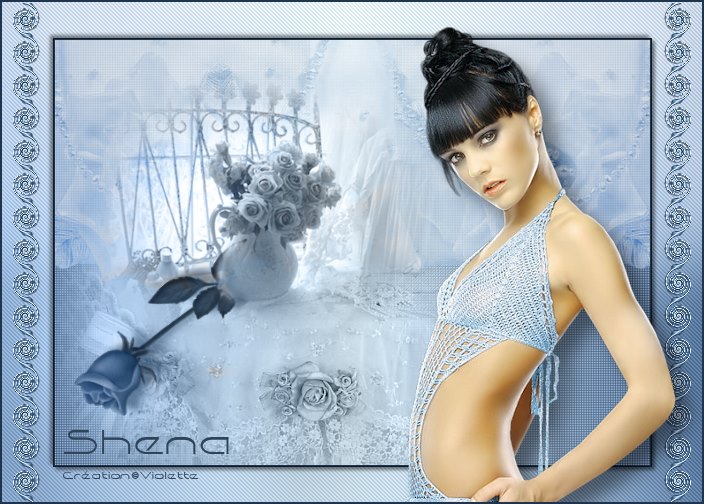
Shena Traduction©Violette *** This tutorial is made with PSP XII but can be carried out in other versions too Tube de Chrismits et de jet Pluggin : ICI pentacom
Material:
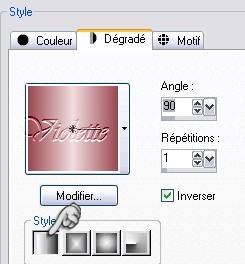
*** 1 - Open your tubes and close duplicate originals Set foreground on color #efddde and set background on color #9c4a52 Configure gradient: style linear/ angle: 90°/ Repeat: 0/ Invert checked
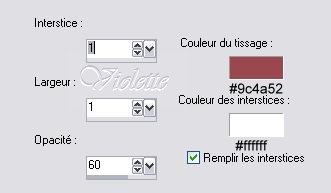
2 - Open a transparent image of 700 x 500 pixels / fill with gradient 3 - Duplicate Effects/Texture Effects/Weave
Blend Mode on : Luminance (Legacy) Opacity to 71%
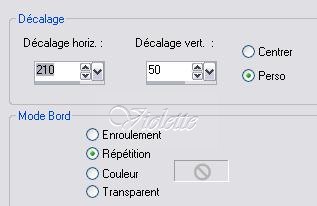
4 - Open the "Chrismist_coussin10.pspimage" tube Image/Miror Edit/Copy/Edit/Paste as a new layer * no move the tube * Effects/Image Effects/Offset: 210/50/ Repetition
Blend Mode on : Luminance Opacity to 66%
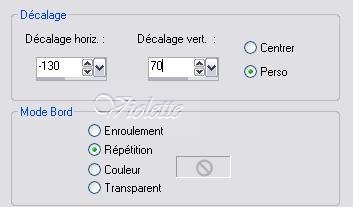
5 - Open the "Chrismist_Marsha3.pspimage" tube Edit/Copy/Edit/Paste as a new layer * no move the tube * Effects/Image Effects/Offset: -130/70/ Repetition
Blend Mode on : Luminance (Legacy) Opacity to 66% Duplicate Blend Mode on : Normal
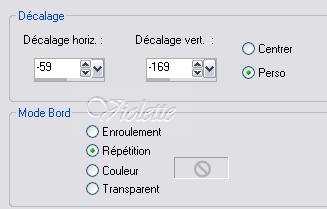
6 - Open the "Chrismist_coll_tea.pspimage" tube Edit/Copy/Edit/Paste as a new layer * no move the tube * Effects/Image Effects/Offset: -59/-169/ Repetition
7 - Layers/Merge/ Merge visible 8 - Edit/Copy 9 - Image/Resize 85 %/resize all layers not checked
10 - Layers/New Layer/Selection/Select AllEdit/Paste Into Selection Adjust/Blur/Gaussian Blur : 30Effects/pentacom/Jean : 62/4 Select/none Right-click in Layer palette/Arrange/to go down
11 - Activate the higher copy Selection/Select All/Selection/Float Effects/3D Effects/ Ciselage :
Select/None
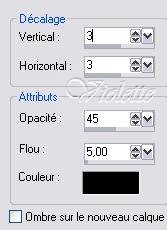
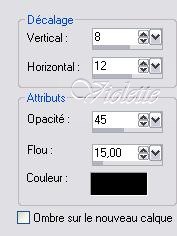
Effects/3D Effects/Drops Shadow : 3/3/45/5/blackRépéter avec des valeurs négatives : -3 en décalage vertical et horizontal
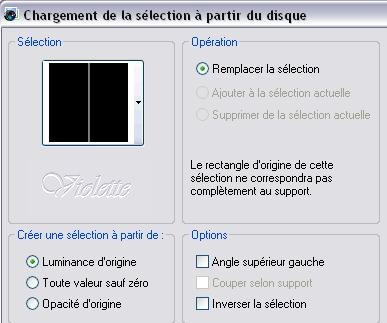
12 - Layers/New Layerselection/charge/record a selection/charge starting from the disc to choose the selection "vyp_shena.PspSelection"
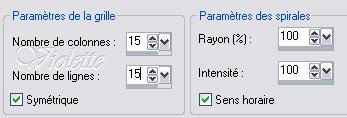
fill with gradient Select/None Effects/Effects of Spiral deformation/
Duplicate Layers/Arrange/Move down Adjust / Sharpen / Sharpen Effects/3D Effects/Drops Shadow : 1/1/45/1/black Duplicate/Image/Miror
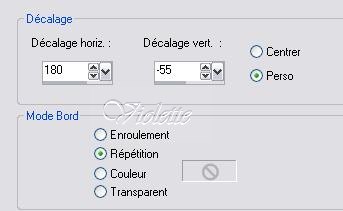
13 - Open the "Jet-Woman09-april-2008.pspimage"tubeEdit/Copy/Edit/Paste as a new layer Image/Resize 75 %/resize all layers not checked * no move the tube * Effects/Image Effects/Offset: 180/-55/ Repetition
Effects/3D Effects/Drops Shadow : 8/12/45/15/black
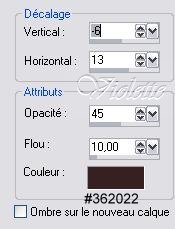
Open the "rose.pspimage"tube Edit/Copy/Edit/Paste as a new layer Image/miror/Image/Flip Image/Resize 85 %/ resize all layers not checkedrepeat a new activate the tool Transformation to set up erase part of the stem Blend Mode on : Luminance Duplicate Blend Mode on : normalOpacity to 62% To activate the lower copy Effects/3D Effects/Drops Shadow : -6/13/45/10/color #362022
14 - Layers/Merge/ Merge visible
15 - Activate your Text tool /Font Capsule/Size on 36/ Vectorial Background on color: #362022 Type: Shena Layer palette/ right-click on Vector 1/ Convert to rasterlayer
16 - Image / Add borders: 2 pixels color #362022 17 - Type your name 18 - Layers / Merge/ Merge all 19 -Exported JPEG Optimiser
another version:
This tutoriel is of my creation It is strictly interdict to copy it or to distribute it on the Net *** 10 Mai 2008 ***
|