|
PaintShopPro ***
Yanelle Traduction©Violette *** This tutorial is made with PSP XII but can be carried out in other versions too *** To make this tutoriel you will need:
***
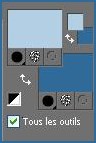
*** 1 - Open your tubes and close duplicate originals Put your filters in your file Filters of My PSP Files *** 2 - Set foreground on color #b3cfe3 and set background on color #2f6a99
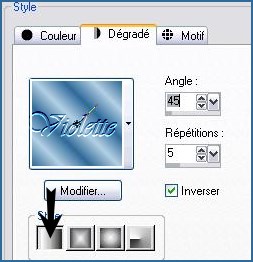
3 - Configure gradient: style linear/ angle: 45°/Repeats: 5/ Invert checked
4 - Open a transparent image of 750 x 500 pixels / fill with gradient Adjust/Blur/Gaussian Blur : 30
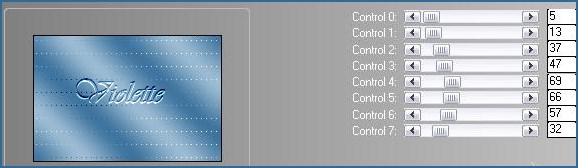
5 - Effects/L&K's/Zitah :
6 - Effects/Edge effects/Enhance
7 - Layers/New Layer fill the canvas with color #5e8bb1
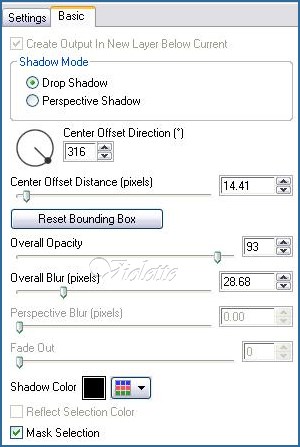
8 - Activate the "Mask_VioletteA4.jpg" mask Layers / New Layer mask / from an image / mask : "Mask_VioletteA4.jpg" Layers/Delete/Layers/merging the group 9 - Effects/Alien Skin Eye Candy Impact /Perspective Shadow
/Drop Shadow Blurry Onglet Basic settings :
Adjust/Sharpen/Sharpen More
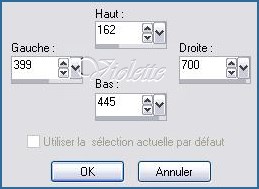
10 - Layers/New Layer Activate the Selection Tool/click on Personalized Selection/ settings
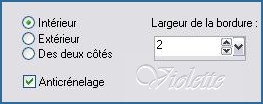
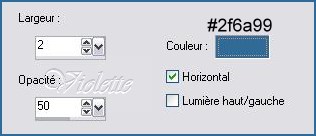
Selections/Modify/Select selection borders:
full color #2f6a99 11 - Effects/Xero/Frittilary réglages par défaut Adjust/Sharpen/Sharpen Selection/none
12 - Select the center framework with magic wand
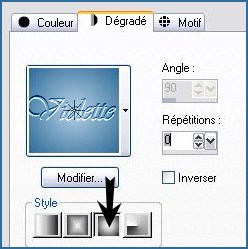
Layers/New Layer Fill with gradient halo/Repeat: 0
Selection/none Layers/Arrange/Move down
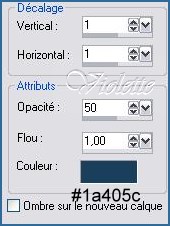
13 - Activate raster framework: Effects/3D Effects/Drops Shadow : : 1/1/50/1/1a405c
Repeat with negative values: -1 in vertical and horizontal shift
14 - Merge the layer with
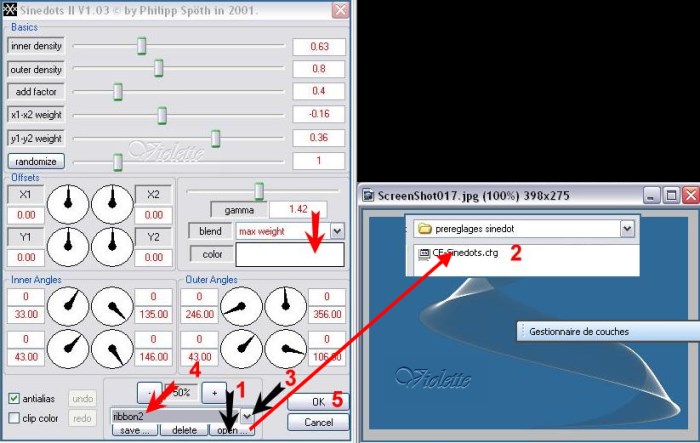
the below Layer 15 - Layers/New LayerEffects/Dragon Fly/Sinedots II/preset To follow the n°/well it is necessary to go to seek the preset cf-Sinedots.ctg in the file where you arranged and in this element to choose the preset " ribbon2" / color #ffffff
Image/Miror
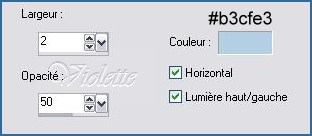
16 - Effects/Image Effects/Offset: 110/10/ Custom/Transparent
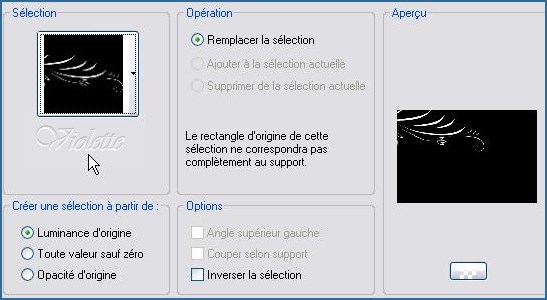
17 - Layers/New Layer Selection/charge/charge a selection/charge starting from the disc to choose selection "Vyp_Yanelle01.PspSelection"
fill with color #2f6a99 Selection/none
18 - Effects/3D Effects/Drops Shadow :1/1/50/1/couleur #1a405c
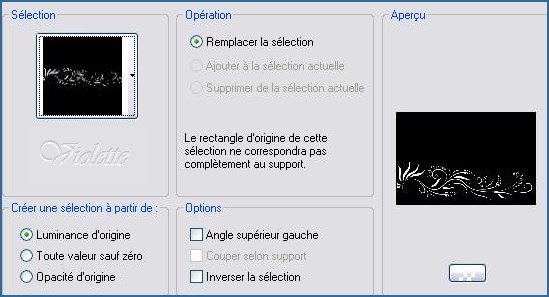
19 - Layers/New Layer Selection/charge/charge a selection/charge starting from the disc to choose selection "Vyp_Yanelle02.PspSelection"
fill with color #2f6a99 Selection/none
20 - Effects/3D Effects/Drops Shadow :1/1/50/1/couleur #1a405c
21 - Open the "PTT_Lady_WhiteDress_Aug2008.pspimage" tubeImage/Resize 80 %/ resize all layers not checkedEdit/Copy/Edit/Paste as a new layer * no move the tube *
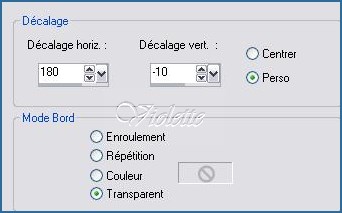
22 - Effects/Image Effects/Offset: 180/-10/ Custom/Transparent
23 - Duplicate/closed the copy Activate the original tube Adjust/Blur/Gaussian Blur : 20Effects/Effet de distortion/Wind : 100 to right
Effects/ Textures Effects/Blinds
24 - Activate the copy: Effects/Alien Skin Eye Candy Impact /Perspective Shadow: Drop Shadow ,Blurry color #1a405c
25 - Image/Add borders: 2 pixels color #ffffff 26 - Image/Add borders: 35 pixels color #b3cfe3 Select the edge with magic wand Effects/ Textures Effects/Blinds
Adjust/Sharpen/Sharpen
27 - Selection/Invers Selections/Modify/Contract 2 pixels Effects/3D Effects/Cutout/settings : 4/4/80/15/couleur #1a405c Repeat with negative values: -4 in vertical and horizontal shift Select/None 28 - Image/Add borders: 2 pixels color #ffffff
29 - Activate the text tool/Font Better Off1/Size: 120/Vectorial foreground closed/background color #ffffff Put the letter: YLayer palette/ right-click on Vector 1/ Convert to rasterlayer
30 - Font Chaparral / Size: 50/Vectorial
foreground closed/background color #ffffff Put the text: anelleLayer palette/ right-click on Vector 1/ Convert to rasterlayer Put side by side
31 - Merge the layer with the below Layer Give a dropshadow : 1/1/50/1/color #1a405c
32 - Type your name 33 - Layers / Merge/ Merge all 34 -Exported JPEG Optimiser
Another version:
This tutoriel is of my creation It is strictly interdict to copy it or to distribute it on the Net *** August 24, 2008 ***
|