|
|

PaintShopPro
***
![]()
![]()
![]()
Mailyss
***
This tutorial is made with PSP XII but can be carried out in other versions too
***
Supplies :
** Filter Funhouse ICI - Install in to your psp plug in folder
** Filter Pentacom ICI - Install in to your psp plug in folder
** Filter Mura's Meister ICI - Install in to your psp plug in folder
** Filter Alien Skin Eye Candy Impact 5 ICI - Presets : ICI install in to your shadow plug in folder
** Vyp_Selections_Mailyss ICI - Install in to your psp select folder
** Tube Giada ICI with her autorisation ICI. Thank You
** Tube Muguet ICI
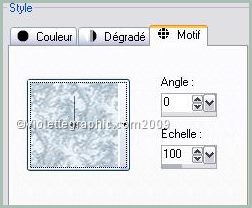
** Pattern Vintage ICI Install in to your psp pattern folder
The tubes are offered to personal use
You do not have the permission to place these tubes on another site without the permission of the creator
***
|
|
Cette flèche pour marquer votre ligne
Clic gauche pour la déplacer |
***
1 - Open your tubes and close duplicate originals
***
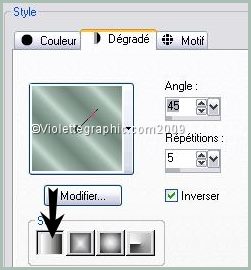
2 - Set foreground on color #deece6 and set background on color #6f8579
3 - Configure gradient: style linear/ angle: 45°/Repeats: 5/ Invert checked
4 - Open a transparant:
500 x 400 pixels and floodfill your image
with this gradient
5 - Adjust/Blur/Gaussian Blur : 30
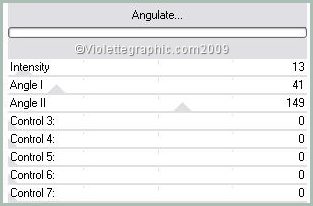
6 - Effects/Filter Funhouse/Angulate :
Effects/Edge effects/Enhance
7 - Layers/Duplicate
Image/Flip
Opacity to 50%
8 - Merge the layer with
the below Layer
9 - Layers/New layer
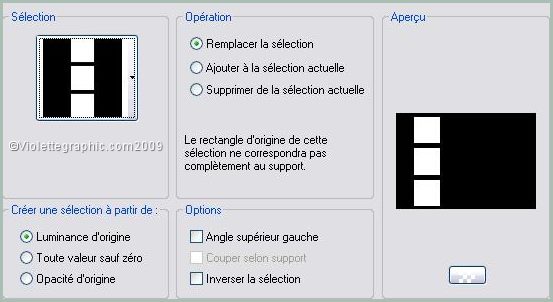
10 - Selections/ load / load from disk and find: "Vyp_Mailyss1.PspSelection"
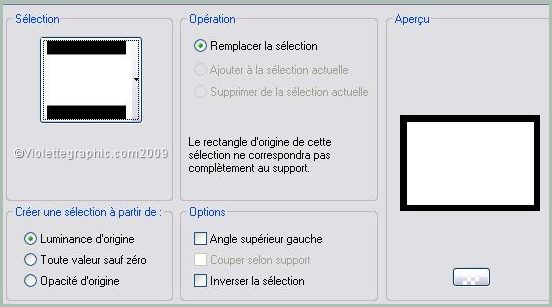
11 -
Floodfill the selection with the pattern vintage
Opacity to 50%
Blend Mode : Luminance (L)
12 -
Selections/ Modify /Selection
/Select selection borders:
zoomer very, very
Floodfill the selection with the color #3d5949
Faire attention à bien remplir les quatre côtés
Select/None
13 -
Effects/3D Effects/Drops Shadow :

***
14 - Activate the top layer
Layers/New layer
15 - Selections/ load / load from disk and find: "Vyp_Mailyss2.PspSelection"
Floodfill the selection with the gradient linear/
angle : 45°/Repeat : 1/Inverser checked
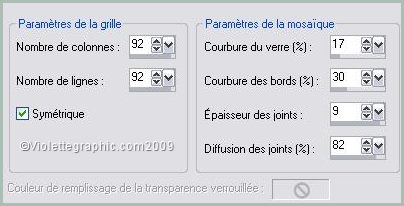
16 - Effects/Textures Effects/ Mosaïc glass:
17 - Selections/ Modify /Selection /Select selection borders:
zoomer very, very
Floodfill the selection with the color #243e2f
Select/None
18 - Drop Shadow n° 13
19 - Activate the top layer
Layers/New layer
20 - Selections/ load / load from disk and find: "Vyp_Mailyss3.PspSelection"
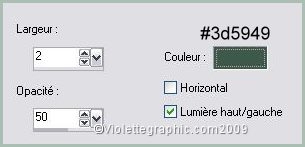
21 - Floodfill the selection with the color #6f8579
Effects/ Textures Effects/Blinds:
22
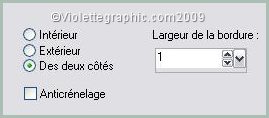
- Selections/Modify/Contract 25 pixelshit your delete key
Select/None
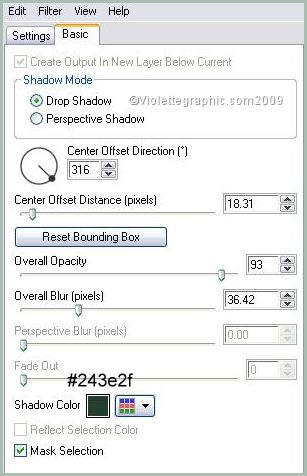
23 - Effects/Filter Alien Skin Eye Candy Impact /Perspective Shadow /Drop Shadow Blurry
preset "Vyp_shadow_Mailyss1.fs" /OK
Onglet basic :
24 - Activate Magic Wand :
![]()
Select interior frame 1
25 - Activate image
muguet.jpg
Edit/Copy
26 - Layers/new layer
Edit/Paste Into Selection
Blend Mode : Luminosité (L) Select/None
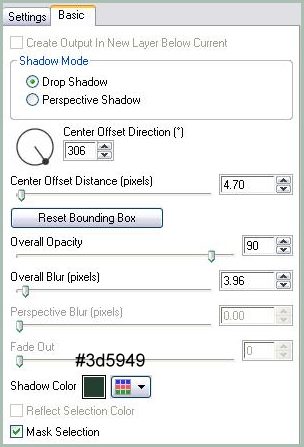
27 - Effects/Alien Skin Eye Candy Impact /Perspective Shadow /Drop Shadow,Lowest
preset "Vyp_shadow_Mailyss2.fs" /OK
Onglet basic :
28 - Effects/Mura's Meister/Copies :
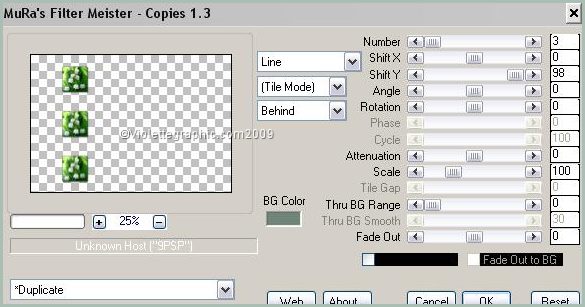
29 - Activate tube "Giada_Wind_of_Change.pspimage"
Edit/Copy/Edit/Paste as a new layer
Image/Resize 80 %/
resize all layers not checked* no move the tube *
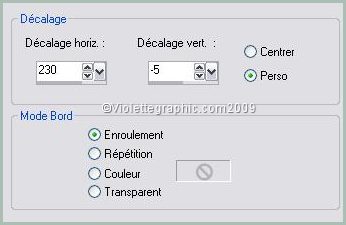
Effects/Image Effects/Offset: 230/-5/ Custom/rolling up
30 - Duplicate/close copy
Activate the original
Adjust/Blur/Gaussian Blur :
20Effects/Distortion Effects/Twirl : 720°
Layers/arange/arange down
repeat
Blend Mode : Luminance (L)
31 - Layers/duplicate
repeat Twirl
Blend Mode : Screen
Opacity to 90%
32 - Activate the copy:
Effects/Alien Skin Eye Candy Impact /Perspective Shadow /Drop Shadow,Lowest
preset "Vyp_shadow_Mailyss3.fs" /OK
Onglet basic :

***
33 - Activate the top layer
Layers/New layer
Selections/ load / load from disk and find: "Vyp_Mailyss4.PspSelection"
Floodfill the selection with the color #ffffff
34 - Effects/3D Effects/Drops Shadow
: 0/0/70/30/color #243e2f
35 - Image/Add borders : 2 pixels color #243e2f
36 - Image/Add borders : 35 pixels color #blanche
Select the edge with magic wand
Floodfill the selection with the gradient linear/
angle: 45°/repeats: 5/invers checked
37 - Effects/ Distortion Effects/Wind to right : 100 / 2 once
Effects/ Distortion Effects/Wind to left : 100 / 2 once
Effects/Edge effects/Enhance
38 - Select/Invers
39 - Effects/3D Effects/Drops Shadow : 5/5/70/10/color #243e2f
Repeat with negative values: -5 in vertical and horizontal shift
Select/None
40 - Image/Add borders : 2 pixels color #243e2f
41 -
Activate your Text tool /Font Capsule/Size on 55/ VectorialBackground on color: #243e2f
42 - Activate the ellipse tool :
![]()
Trace one ellipse
Place on the edge of ellipse so that the letter has under an curve appears
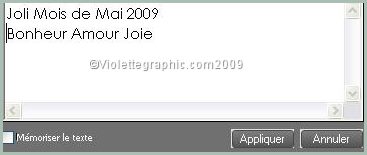
write the text of your choice
if you divide your text in two the second part is placed below the first part of the text:
43 - In the layer
open the + ans close ellipse layer
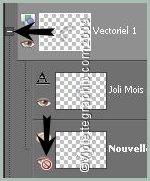
close the -
ellipse is invisible
44 -
Layer /Convert to rasterlayerGive a dropshadow : 0/0/50/10/color #243e2f
45 - Type your name
46 - Layers / Merge/ Merge all
47 -Exported JPEG Optimiser
***
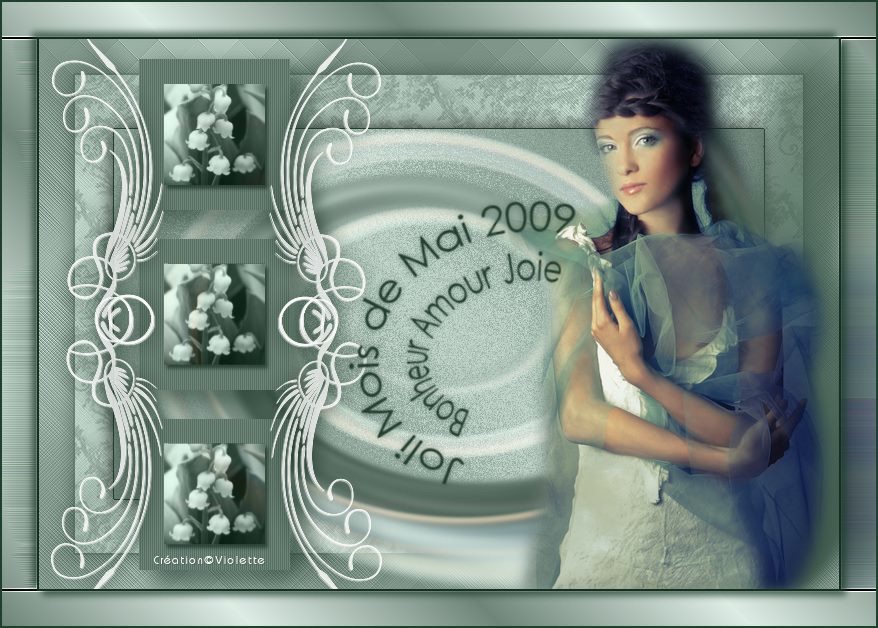
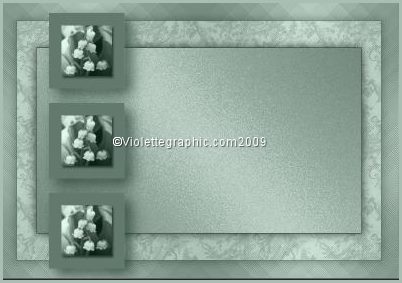
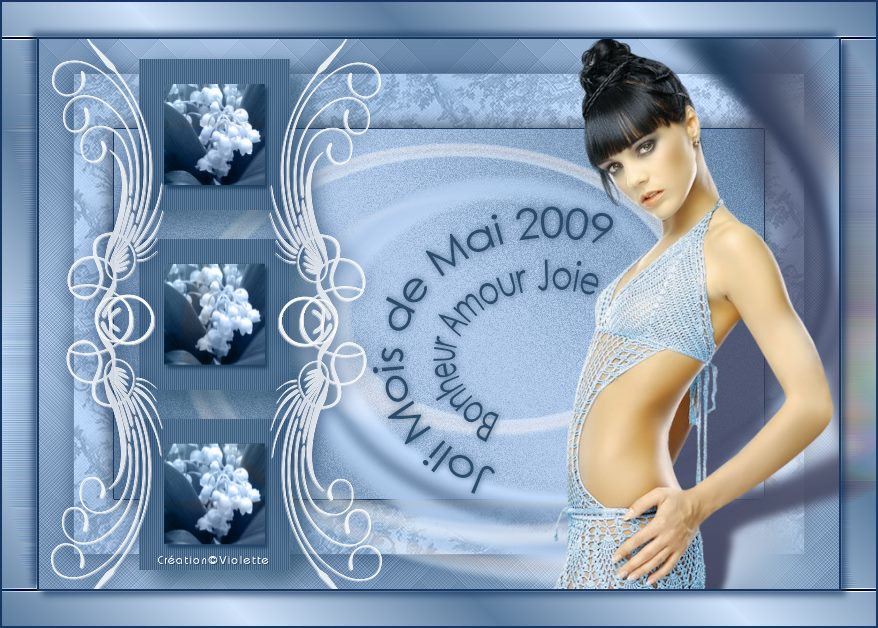
Another version:
|
|
![]()
This tutoriel is of my creation It is strictly interdict to copy it or to distribute it on the Net
***
April 15, 2009
***
![]()